- Log into Paypal.
- Click on your name in the top right hand corner of the page.
- Click ‘Account Settings’.
- Click ‘Website Paymets’.
- Click ‘Update’ next to ‘My automatic payments’.
- Click the name for the person who’s automatic payment you want to cancel.
- Click ‘Cancel’ and then ‘Cancel plan’.
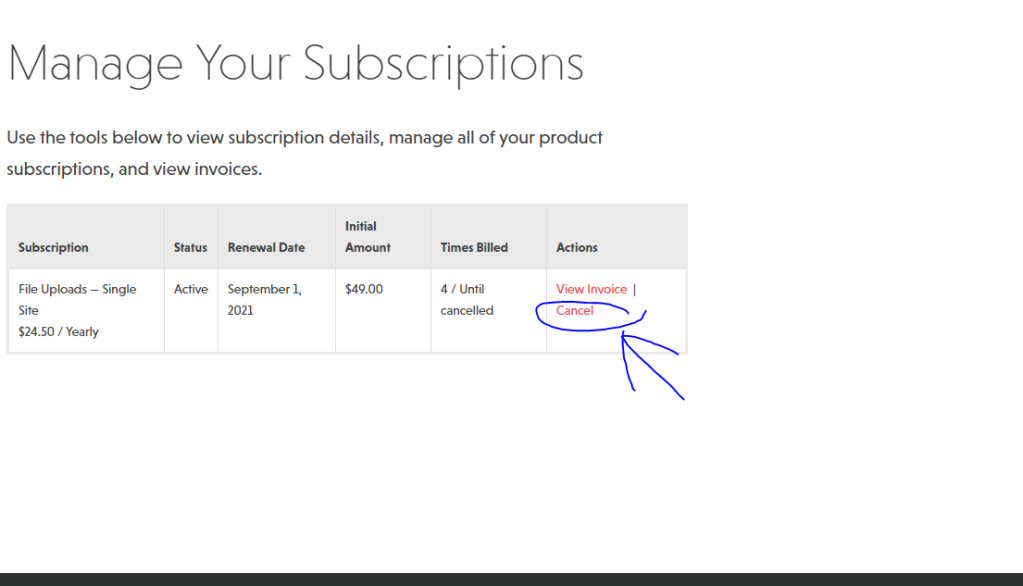
Cancel NinjaForms add-on subscription
1. Go to https://ninjaforms.com/login/ and login or click on the account icon to login.
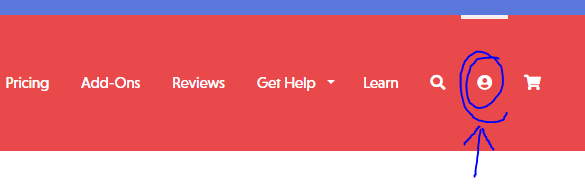
2. click on ‘Subscriptions’ then cancel the subscription.
Cancel a PayPal Subscription
- Log into PayPal.
- Click on ‘Pay & Get Paid’, then click on ‘Subscriptions’.
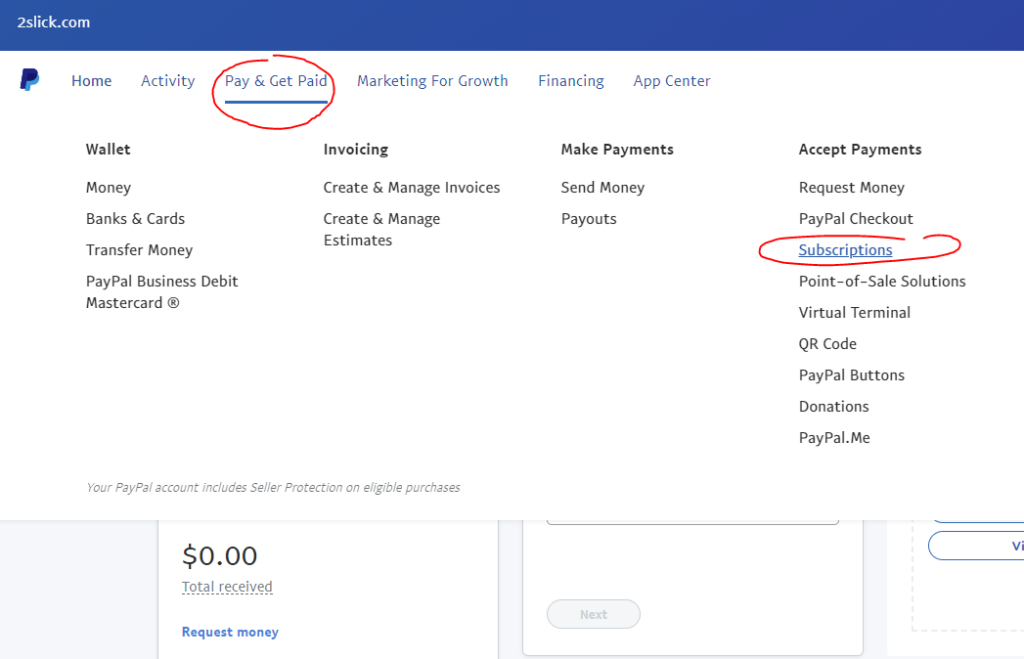
3. Click ‘Subscriptions’ then click on the subscription you want to cancle.
How to update linked PDF files in your WordPress website, Avada Theme
In this tutorial I will show you how to update PDF files that are linked to on pages or posts. I’m using WordPress Version 5.2.2, Avada Theme version 6.0.2.
First you will need to upload your new PDF file to WordPress.
Upload PDF file to WordPress:
- Log into WordPress.
- Click the ‘Media’ link on the left of the WordPress admin. The Media icon looks like this:

- Click the ‘Add New’ button at the top of the page.
- Click the ‘Select Files’ button, and select the media file(PDF file).
Your PDF file is now uploaded to WordPress.
Next
How to get link for media file (PDF):
- Log into WordPress.
- Click the ‘Media’ link on the left of the WordPress admin. The Media icon looks like this:
- From the gallery, click the media file you want the link for.
- Double click the link field and copy the link using the keyboard keys: CTRL + C.
Next we will update the link on the page/post.
How to update file(PDF) link on page or post:
- Log into WordPress.
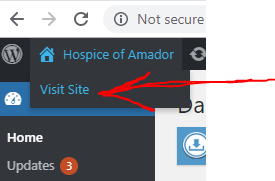
- Mouse hover over the title of your website at the top left of the page and click ‘Visit Site’.
- Navigate to the page or post with the link you’d like to update and click ‘Edit Page’.
- Make sure the ‘Fusion Builder Live’ button is highlighted as blue.
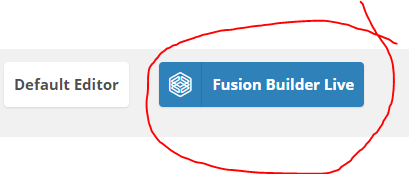
- If the ‘Fusion Builder Live’ button is grayed out, click it so it turns blue.
- Scroll down to the section that contains the link that you’d like to edit and mouse hover over the section and click the ‘Element Options’ icon that appears.

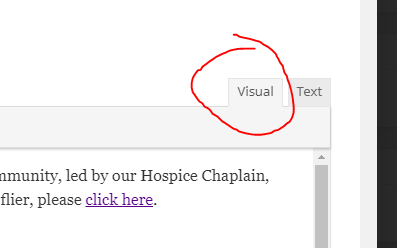
- Click the ‘Visual tab’ if it’s not already selected.
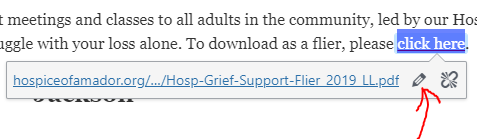
- Highlight the link that needs to be updated and click the ‘Edit’ icon.
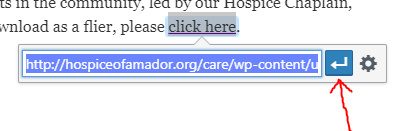
- Past the new link into the field using the keys: CTRL + v, then click the ‘Apply’ icon.
- Click the ‘Save’ button.
- Next click the ‘Update’ button.
Don’t for get to logout of WordPress when you’re done.
How to upgrade WordPress up to 5.1 and Also the Avada Theme.
WordPress’s upgrade to 5.0 and 5.1 broke many self-hosted WordPress themes. The Avada WP theme is the most popular theme on ThemeForest.com so I’ll also go over how to upgrade that also.
Below is a general outline of how to upgrade WordPress and the theme up to 5.1.
- Back up the website files and database.
- Check/update hosting software(PHP, MySQL) versions. PHP should be at least 7.0 and MySQL should be at least 5.6. You can check your current server setting by logging into cPanel and clicking the ‘Server Information’ link.
- Update the WP memory requirements to current. Update the file: wp-config.php.
Just under the line “define(‘WP_DEBUG’, false);” place this code;
//set execution time
set_time_limit(300);
//set memory limit
define(‘WP_MEMORY_LIMIT’, ‘256M’); - Update the max input vars by adding a php.ini file to the wp-admin folder. In the php.ini file write this line:
max_input_vars = 3000; - You might also want to add these limits in the .htaccess file also.
php_value max_execution_time 180
Next steps are to auto update or manually update(version 4.0.3 or older) Avada.
Auto Update.
- Register the Avada theme if you haven’t already. Login into WP > Avada > Registration. Follow the instructions to, input the key and finish registration
- Next we will auto update WordPress. Dashboard > Updates. Follow the instructions for theme update.
Increase WordPress file execution time
If you’re getting the “Fatal error: Maximum execution time of 30 seconds exceeded in…” error in WordPress then, you need to increase the WordPress execution time limit.
How to increase the execution time in WordPress:
- Connect to your website’s server via an FTP program.
- Download the file ‘public_html’ > ‘wp-config.php’.
- Use a text editor or code editor to add this line of code “set_time_limit(400);” just before where it says “That’s all, stop editing! Happy blogging.”. Save the changes.
- Use the FTP program to upload and replace ‘wp-config.php’ with the edited version.
The execution time limit error should be gone.
Increase memory in WordPress
If you’re getting the “Fatal error: Allowed memory size…” error in WordPress then, you need to increase the WordPress memory limit.
How to increase the memory limit in WordPress:
- Connect to your website’s server via an FTP program.
- Download the file ‘public_html’ > ‘wp-config.php’.
- Use a text editor or code editor to add this line of code “define( ‘WP_MEMORY_LIMIT’, ‘300M’ );” just before where it says “That’s all, stop editing! Happy blogging.”. Save the changes.
- Use the FTP program to upload and replace ‘wp-config.php’ with the edited version.
The memory limit error should be gone.
How to install WordPress before domain propagation, Hostgator
HostGator lets you install WordPress before domain propagation using the special link:
http://geo.temp.domains/~username/
“username” needs to be the username for your HostGator hosting account.
- Log into your HostGatot hosting account cPanel.
- Install WordPress using ‘QuickInstall’.
- After you install WordPress, click on ‘PHPMyAdmin’ in cPanel.
- Click on the ‘wp-optoins’ table.
- Next change the ‘option_value’ for fields ‘option_name’ ‘siteurl’ and ‘home’ to be the temporary url.

Note: when the domain propagates, you must change ‘option_name’ back to the original URLs.
How to create PayPal button with custom fields
You can easily create a custom PayPal button or donation button with custom user input fields using just HTML. In this example we will make a donation button.
PayPal Button Instructions Page
First lets look at a basic HTML markup for a PayPal button:
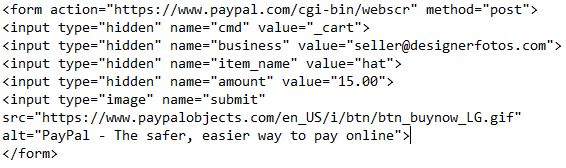
Next we will modify this markup for our own use.
Change ‘cmd’ field:
Right now the ‘cmd’ field value variable is set to ‘_cart’, which defines our button as an ‘add to cart’ button. Change the ‘cmd’ variable to ‘_donations’.
Change the ‘business’ field:
Replace the ‘business’ field value with your PayPal account email address.
Change the ‘item_name’ field:
Change the item name field value to ‘my website donation’.
Change the ‘amount’ field:
Now let’s change the ‘amount’ field so that the person donating can specify the donation amount, a label and make the field required.
![]()
Specify return page:
Lets add a return variable that specifies the thank you page we want the user to return to after making the donation. Replace the google url with your own.
![]()
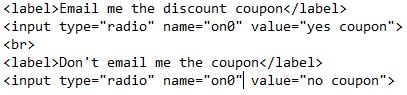
Add a custom field radio button:
Let’s create a custom radio button field where the person donating gets to opt in to receive a free coupon.
Add a note field:
This field lets the user add a note to his donation.
![]()
Change ‘image’ field:
Right now the button for our form would appear as a ‘Buy’ button, let’s change it to a ‘Donation’ button. Change the ‘btn_buynow_LG’ text in the ‘src’ field variable to ‘btn_donate_LG’.
You’re done!
You can add more custom input fields this way. For a list of more PayPal variables to modify go here.
How to change the Avada Theme/Theme Fusion Portfolio item image hover color
Enter the style below into the ‘Custom CSS’ field and adjust them:
/* portfolio photo hover color */
.fusion-image-wrapper .fusion-rollover {
background-image: linear-gradient(top, rgba(224,224,224,0.8) 0%, #333 100%);
background-image: -webkit-gradient(linear, left top, left bottom, color-stop(0, rgba(224,224,224,0.8)), color-stop(1, #333));
}
